Difference between revisions of "Mechanics"
(specify jump indicator timing) |
|||
| Line 76: | Line 76: | ||
* "'''Good Clear'''": Made 1 mistake (Fail to perform 1 action on beat or took 1 hit of damage) | * "'''Good Clear'''": Made 1 mistake (Fail to perform 1 action on beat or took 1 hit of damage) | ||
* "'''Okay Clear'''": Made 2-4 mistakes | * "'''Okay Clear'''": Made 2-4 mistakes | ||
| − | * "'''Room Cleared'''": Made 5+ mistakes | + | * "'''Room Cleared'''": Made 5+ mistakes or Auto Rhythm is enabled. |
Upon clearing a room, a [[Chests|chest]] appears (except for some miniboss rooms or if the zone has the [[Modifiers#Barren|Barren Modifier]]). A [[Chests#Flawless_Chest|Flawless Chest]] appears when the room is cleared flawlessly; otherwise a [[Chests#Plan_Chest|Plain Chest]] appears. There is a random chance that a more rare chest will appear regardless of the clear quality. | Upon clearing a room, a [[Chests|chest]] appears (except for some miniboss rooms or if the zone has the [[Modifiers#Barren|Barren Modifier]]). A [[Chests#Flawless_Chest|Flawless Chest]] appears when the room is cleared flawlessly; otherwise a [[Chests#Plan_Chest|Plain Chest]] appears. There is a random chance that a more rare chest will appear regardless of the clear quality. | ||
Revision as of 19:33, 12 October 2020
This page contains some info about the core mechanics of the game.
Contents
Beat
Actions you and enemies perform must be done to the beat of the music. These include:
- Firing
- Reloading
- Dodging (Dashing)
- Using abilities
Note that jumping and moving does not have to be done to the beat of the song.
Rhythm Bar
The Rythym Bar appears in the center of the screen and acts as both a crosshair and an indicator of when to perform actions on beat.
The large arrows indicate full beats, and the small arrows indicate half beats. Any action can be performed on either a full or half beat.
Indicators
When fighting certain enemies, the rhythm bar will display special indicators instead of the usual full beat arrows. These indicators warn the player that an action needs to be taken to avoid an attack.

Directional Dash Indicator
- Shown as a fancy beat arrow on one side of the rythym bar.
- Indicates that the player should dash in the direction of the arrow when it reaches the center.
- Unique to Draugr's area attacks.
- This attack can also be avoiding by strafing instead of dashing.

Dash Indicator
- Shown as a fancy beat arrow on both sides of the rythym bar.
- Indicates that the player should dash either left or right when it reaches the center.
- Examples include Guardian projectiles and Nidhogg's fireball.
- Some attacks with this indicator can also be avoided by strafing instead of dashing.

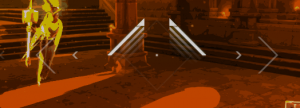
Jump Indicator
- Shown as a thick line on the top half of both sides of the rythym bar and converges in the center to form an upwards arrow.
- Indicates that the player should jump when it reaches the center.
- Examples include one of Draugr's projectile attacks and Gullveig's ground attack.
- Timing the jump to the indicator is not necessary since jumps can be performed off-beat. These attacks will miss as long as you aren't on the ground when the indicator reaches the center.

Hide/Block Indicator
- Shown as a dotted beat arrow on both sides of the rythym bar.
- Indicates that the player should hide behind something or
 Block when it reaches the center. Examples include Ymir's beam and Fire Eater barrage.
 - Attacks are usually long-lasting or involve lots of targeted projectiles.
- Some attacks with this indicator can also be avoided by strafing instead of hiding or blocking.
Score
Performing actions on beat increases a score multiplier that ranges from x1 up to x4. Making a mistake (failing to perform an action on beat or taking damage) resets the score multiplier to x1. The score multiplier is not affected while no enemies are in the room. Every beat of the song, you lose an amount of score dependent on the amount of time spent in your run.
| Start time | End time | Score lost per beat |
|---|---|---|
| 00:00 | 9:59 | -1 |
| 10:00 | 19:59 | -10 |
| 20:00 | 29:59 | -100 |
| 30:00 | 39:59 | -200 |
| 40:00 | 49:59 | -400 |
| 50:00 | 59:59 | -1000 |
| 60:00+ | -2000 |
Room Clears
To clear a room, you must kill all enemies in the room. The room is only counted as "clear" the first time you kill all the enemies in the room (killing enemies that spawn in from a Slotted Chest or Cursed Chest after the room has been cleared does not count as clearing the room again).
After you clear a room, a message is displayed on screen indicating the quality of the clear:
- "Flawless Clear": Made no mistakes (Performed all actions on beat and took no damage)
- "Good Clear": Made 1 mistake (Fail to perform 1 action on beat or took 1 hit of damage)
- "Okay Clear": Made 2-4 mistakes
- "Room Cleared": Made 5+ mistakes or Auto Rhythm is enabled.
Upon clearing a room, a chest appears (except for some miniboss rooms or if the zone has the Barren Modifier). A Flawless Chest appears when the room is cleared flawlessly; otherwise a Plain Chest appears. There is a random chance that a more rare chest will appear regardless of the clear quality.
