Difference between revisions of "Altars"
| Line 1: | Line 1: | ||
| − | + | Various '''points of interest''' can appear within [[rooms]], most of them granting the player some boon when interacted with. The two main kinds are chests and shrines. | |
| − | + | '''Chests''' are the most common point of interest. A chest is guaranteed to spawn in an accessible location whenever a room is cleared. An upgraded chest will appear if the room was cleared flawlessly with a chance for an even better chance to spawn {{verification needed|Is this tied to a flawless completion too?}}. | |
| − | Shrines | + | '''Shrines''' appear in most normal [[rooms]], excluding the spawn room on each level. One variant of [[Huginn's shop]] has a secret shrine. Most rooms spawn with a shrine of some kind, but their appearance is not guaranteed. |
| + | Once exhausted (which may take multiple inputs), shrines cannot be used again, and will usually glow with a pale fire or a halo to indicate they've been used. | ||
| + | Only one shrine of each type will spawn in a given room, but rooms can spawn with multiple types of shrines. | ||
| + | Shrines, especially secondary rarer shrines, can be located in hard to access places, usually high up on balconies or ledges. While some of these shrines can be reached via creatively jumping from rails, banisters, mushrooms, etc. having a mobility buff like flying, triple jump, super jump, rocket jump, grenade jump, low gravity level modifier or super speed can help. Some shrines may be impossible to reach with the player's current equipment and stats. | ||
| + | Shrines typically behave the same way given their type, but the player's [[Luck]] stat can induce other, better outcomes, even from basic shrines. | ||
| + | |||
| + | == Chests == | ||
| + | |||
| + | |||
| + | {| class="wikitable sortable" | ||
| + | |- | ||
| + | ! Appearance !! Unofficial Name !! Drops !! Location | ||
| − | + | |- | |
| + | | [[File:NormalChest1.png|100px]] || Plain Chest || | ||
| + | * {{Coins|1}} | ||
| + | * {{ItemLink|Coin Bag}} | ||
| + | * {{ItemLink|Key}} | ||
| + | * {{ItemLink|Small Healing Potion}} | ||
| + | || | ||
| + | * Appears after clearing a room with mistakes. | ||
| + | * Can appear after clearing wave 1 or 2 of a [[Rooms#Challenge_room|Challenge Room]]. | ||
| − | + | |- | |
| + | | [[File:NormalChest2.png|100px]] || Flawless Chest || | ||
| + | * {{Coins|1}} | ||
| + | * {{ItemLink|Coin Bag}} | ||
| + | * {{ItemLink|Key}} | ||
| + | * {{ItemLink|Small Healing Potion}} | ||
| + | || | ||
| + | * Appears after clearing a room flawlessly. | ||
| + | * Can appear after clearing wave 1 or 2 of a [[Rooms#Challenge_room|Challenge Room]]. | ||
| + | |||
| + | |- | ||
| + | | [[File:WideChest.png|100px]] || Wide Chest || | ||
| + | * 1-4{{verification needed}} of any combination of: | ||
| + | ** {{Coins|1}} | ||
| + | ** {{ItemLink|Coin Bag}} | ||
| + | ** {{ItemLink|Key}} | ||
| + | ** {{ItemLink|Small Healing Potion}} | ||
| + | * {{ItemLink|Lucky Dice}} | ||
| + | * Stat Upgrade | ||
| + | * Equipment (low chance of occurence) | ||
| + | || | ||
| + | * Can appear after clearing a room. (Uncommon) | ||
| + | * Can appear after clearing wave 1 or 2 of a [[Rooms#Challenge_room|Challenge Room]]. | ||
| + | |||
| + | |- | ||
| + | | [[File:MidasChest.png|100px]] || Midas Chest || | ||
| + | * {{Coins|1}} | ||
| + | || | ||
| + | * Appears after clearing a room on zones with the [[Modifiers#Midas|Midas]] modifier. | ||
| + | |||
| + | |- | ||
| + | | [[File:NormalKeyChest.png|100px]] || Golden Chest || | ||
| + | * Equipment | ||
| + | * {{ItemLink|Shield}} | ||
| + | * {{ItemLink|Lucky Dice}} | ||
| + | * {{ItemLink|Shield Converter}} | ||
| + | * {{ItemLink|Skeleton Key}} | ||
| + | * Stat Upgrade | ||
| + | * ? | ||
| + | || | ||
| + | * Can appear after clearing a room. (Rare) | ||
| + | * Appears in [[Rooms#Golden_chest_room|Golden Chest Rooms]]. | ||
| + | |||
| + | |- | ||
| + | | [[File:WeaponChest.png|100px]] || Weapon Chest || | ||
| + | * Weapon | ||
| + | || | ||
| + | * Can appear after clearing a room. (Very Rare) | ||
| + | * Appears at the top of the [[Rooms#Tower_room|Tower Room]] in [[Modifiers#Castle|Castle Asgard I]]. | ||
| + | |||
| + | |- | ||
| + | | [[File:FlatKeyChest.png|100px]] || Secret Chest || | ||
| + | * Weapon | ||
| + | * Ability | ||
| + | * Equipment | ||
| + | * Stat Upgrade | ||
| + | * ? | ||
| + | || | ||
| + | * Appears in high or hard to reach places in rooms. | ||
| + | |||
| + | |- | ||
| + | | [[File:BackKeyRoomChest.png|100px]] || Pain Chest || | ||
| + | * Weapon | ||
| + | * Ability | ||
| + | * Equipment | ||
| + | * {{ItemLink|Clip Up}} | ||
| + | * Stat Upgrade | ||
| + | * ? | ||
| + | || | ||
| + | * Appears behind the damage barrier in [[Rooms#Golden_chest_room|Golden Chest Rooms]]. | ||
| + | |||
| + | |- | ||
| + | | [[File:BossChest.png|100px]] || Boss Chest || | ||
| + | * Stat Upgrade | ||
| + | * {{ItemLink|Clip Up}} | ||
| + | || | ||
| + | * Appears after defeating a boss. | ||
| + | |||
| + | |- | ||
| + | | [[File:ChallengeRoomChest.png|100px]] || Challenge Chest || | ||
| + | * Weapon | ||
| + | * Ability | ||
| + | * Equipment | ||
| + | * Stat Upgrade | ||
| + | * {{ItemLink|Skeleton Key}} | ||
| + | * ? | ||
| + | || | ||
| + | * Appears after clearing the 3rd wave of a [[Rooms#Challenge_room|Challenge Room]]. | ||
| − | + | |- | |
| + | | [[File:BankChest.png|100px]] || Bank Chest || | ||
| + | * 2-6 of any combination of: | ||
| + | ** {{Coins|1}} | ||
| + | ** {{ItemLink|Coin Bag}} | ||
| + | ** {{ItemLink|Key}} | ||
| + | || | ||
| + | * Appears in the [[Rooms#Bank|Bank]] vault that becomes accessible if you have 100+ coins deposited. | ||
| − | + | |- | |
| + | | [[File:TripleChest.png|100px]] || Cursed Chests || | ||
| + | * 2/3 contain a {{EnemyLink|Fly}} | ||
| + | * 1/3 contains any of: | ||
| + | ** {{ItemLink|Coin Bag}} | ||
| + | ** {{ItemLink|Shield}} | ||
| + | ** {{ItemLink|Large Healing Potion}} | ||
| + | ** Equipment | ||
| + | ** Ability | ||
| + | ** Stat Upgrade | ||
| + | || | ||
| + | * Appears in rooms as a form of shrine. | ||
| − | + | |} | |
| − | |||
| − | + | == Shrines == | |
| − | === Blessing | + | === Blessing shrines === |
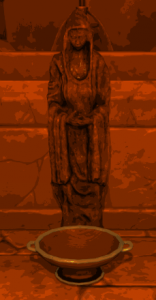
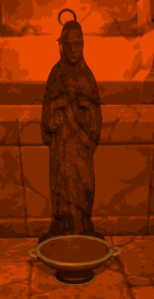
| − | These are the most common shrines, and take the form of statues with small offering bowls. They are easily accessible and usually appear along the peripheral walls of the room. They will accept a single {{coins|coin}} in exchange for a +1 boost to the character's stat, dependent on the statue. | + | These are the most common shrines, and take the form of statues with small offering bowls. They are easily accessible and usually appear along the peripheral walls of the room. They will accept a single {{coins|coin}} in exchange for a +1 boost to the character's stat, dependent on the statue. Often times blessing shrines can be difficult to spot; they tend to blend into their surroundings, both in color and in geometry. Scanning the peripheral walls of the room is a good start. |
<gallery heights="200px" mode=packed> | <gallery heights="200px" mode=packed> | ||
SpeedShrine.png|Speed Shrine | SpeedShrine.png|Speed Shrine | ||
| Line 30: | Line 153: | ||
</gallery> | </gallery> | ||
| − | === Angel and | + | |
| + | === Angel and devil shrines === | ||
| + | <gallery heights="200px" style="float:right;clear:right"> | ||
| + | AngelShrine.png|Angel Shrine | ||
| + | DevilShrine.png|Devil Shrine | ||
| + | </gallery> | ||
These shrines take the form of large statues with urns, and will accept a random number between 1 and 5 of coins (for the Angel Shrine) or keys (for the Devil Shrine) in exchange for a random result. The random results include: | These shrines take the form of large statues with urns, and will accept a random number between 1 and 5 of coins (for the Angel Shrine) or keys (for the Devil Shrine) in exchange for a random result. The random results include: | ||
* a stat increment consumable, eg. {{ItemLink|Luck Up}} | * a stat increment consumable, eg. {{ItemLink|Luck Up}} | ||
| Line 39: | Line 167: | ||
* a random [[weapon]] | * a random [[weapon]] | ||
* a {{ItemLink|Skeleton Key}}. | * a {{ItemLink|Skeleton Key}}. | ||
| − | |||
| − | |||
| − | |||
| − | |||
| − | |||
| − | |||
| − | |||
| − | |||
| − | === | + | === Slot machine === |
| − | These take the form of small, square chests with a slot | + | These take the form of small, square chests with a slot in the front into which a coin is inserted. Upon inserting a coin a random outcome will occur: |
* Nothing. Represented by a puff of smoke. | * Nothing. Represented by a puff of smoke. | ||
* An enemy spawns. Can be one of: | * An enemy spawns. Can be one of: | ||
| Line 66: | Line 186: | ||
In addition to a previous effect, the machine can jam. The coin will remain in the slot and no further input will be accepted. | In addition to a previous effect, the machine can jam. The coin will remain in the slot and no further input will be accepted. | ||
| + | |||
| + | === Damocles' sword === | ||
[[File:DamoclesSword.png|thumb|upright=0.25|Damocles' Sword]] | [[File:DamoclesSword.png|thumb|upright=0.25|Damocles' Sword]] | ||
| − | |||
| − | |||
This shrine resembles a small pillar with either a Bag of Coins, a Max HP Potion, or a Key with a floating, fiery sword above. Activating it deals 25 damage to the player, in exchange for whatever is resting on the pillar. Can also rarely contain a max health increase upgrade. The damage can be reduced or avoided with abilities and items like {{AbilityLink|Block}} and {{AbilityLink|Valkyrie's Veil}}, which will negate the damage completely, or {{AbilityLink|Skjaldmeyjar's Plate}} which will reduce the damage to 15.{{clr}} | This shrine resembles a small pillar with either a Bag of Coins, a Max HP Potion, or a Key with a floating, fiery sword above. Activating it deals 25 damage to the player, in exchange for whatever is resting on the pillar. Can also rarely contain a max health increase upgrade. The damage can be reduced or avoided with abilities and items like {{AbilityLink|Block}} and {{AbilityLink|Valkyrie's Veil}}, which will negate the damage completely, or {{AbilityLink|Skjaldmeyjar's Plate}} which will reduce the damage to 15.{{clr}} | ||
| − | == | + | == Other == |
| − | These | + | These points of interest are unique and only appear in certain parts of the game. |
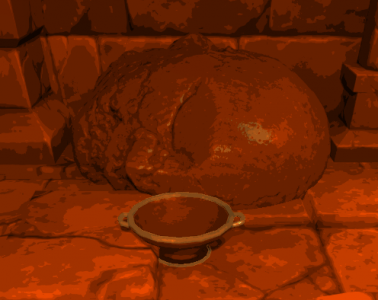
=== The Dish === | === The Dish === | ||
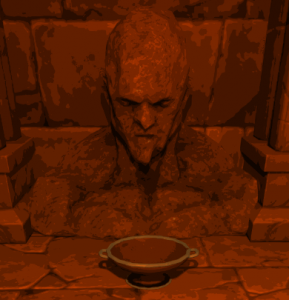
| − | Located in [[zones|Helheim 2]]. After depositing {{coins|100}}, {{ItemLink|Giant Slayer Boots}} will appear. All subsequent runs will spawn the boots. | + | Located in the right room of [[zones|Helheim 2]]. After depositing {{coins|100}}, {{ItemLink|Giant Slayer Boots}} will appear. All subsequent runs will spawn the boots. |
Revision as of 16:33, 13 October 2020
Various points of interest can appear within rooms, most of them granting the player some boon when interacted with. The two main kinds are chests and shrines.
Chests are the most common point of interest. A chest is guaranteed to spawn in an accessible location whenever a room is cleared. An upgraded chest will appear if the room was cleared flawlessly with a chance for an even better chance to spawn [Is this tied to a flawless completion too? • edit • ?].
Shrines appear in most normal rooms, excluding the spawn room on each level. One variant of Huginn's shop has a secret shrine. Most rooms spawn with a shrine of some kind, but their appearance is not guaranteed. Once exhausted (which may take multiple inputs), shrines cannot be used again, and will usually glow with a pale fire or a halo to indicate they've been used. Only one shrine of each type will spawn in a given room, but rooms can spawn with multiple types of shrines. Shrines, especially secondary rarer shrines, can be located in hard to access places, usually high up on balconies or ledges. While some of these shrines can be reached via creatively jumping from rails, banisters, mushrooms, etc. having a mobility buff like flying, triple jump, super jump, rocket jump, grenade jump, low gravity level modifier or super speed can help. Some shrines may be impossible to reach with the player's current equipment and stats. Shrines typically behave the same way given their type, but the player's Luck stat can induce other, better outcomes, even from basic shrines.
Contents
Chests
| Appearance | Unofficial Name | Drops | Location |
|---|---|---|---|
 |
Plain Chest |
| |
 |
Flawless Chest |
| |
 |
Wide Chest |
|
|
 |
Midas Chest |
|
|
 |
Golden Chest |
|
|
 |
Weapon Chest |
|
|
 |
Secret Chest |
|
|
 |
Pain Chest |
|
|
 |
Boss Chest |
|
|
 |
Challenge Chest |
|
|
 |
Bank Chest |
| |
| Cursed Chests |
|
|
Shrines
Blessing shrines
These are the most common shrines, and take the form of statues with small offering bowls. They are easily accessible and usually appear along the peripheral walls of the room. They will accept a single coin![]() in exchange for a +1 boost to the character's stat, dependent on the statue. Often times blessing shrines can be difficult to spot; they tend to blend into their surroundings, both in color and in geometry. Scanning the peripheral walls of the room is a good start.
in exchange for a +1 boost to the character's stat, dependent on the statue. Often times blessing shrines can be difficult to spot; they tend to blend into their surroundings, both in color and in geometry. Scanning the peripheral walls of the room is a good start.
Speed Shrine
Range Shrine
Luck Shrine
Damage Shrine
Precision Shrine
Ability Shrine


Angel and devil shrines
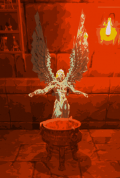
Angel Shrine
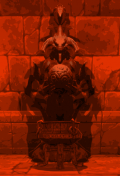
Devil Shrine


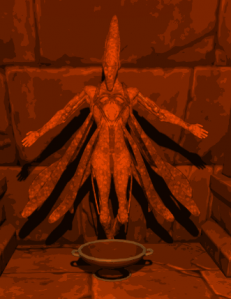
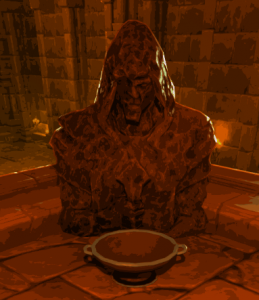
These shrines take the form of large statues with urns, and will accept a random number between 1 and 5 of coins (for the Angel Shrine) or keys (for the Devil Shrine) in exchange for a random result. The random results include:
- a stat increment consumable, eg.
 Luck Up
 - a
 Key (Angel Shrine only[verification needed • edit • ?])
 - a random equippable item
- an ultimate ability book
- a secondary ability scroll
- a random weapon
- a
 Skeleton Key.
Slot machine
These take the form of small, square chests with a slot in the front into which a coin is inserted. Upon inserting a coin a random outcome will occur:
- Nothing. Represented by a puff of smoke.
- An enemy spawns. Can be one of:
- A consumable spawns. Can be one of:
In addition to a previous effect, the machine can jam. The coin will remain in the slot and no further input will be accepted.
Damocles' sword

This shrine resembles a small pillar with either a Bag of Coins, a Max HP Potion, or a Key with a floating, fiery sword above. Activating it deals 25 damage to the player, in exchange for whatever is resting on the pillar. Can also rarely contain a max health increase upgrade. The damage can be reduced or avoided with abilities and items like ![]() Block and
Block and ![]() Valkyrie's Veil, which will negate the damage completely, or
Valkyrie's Veil, which will negate the damage completely, or ![]() Skjaldmeyjar's Plate which will reduce the damage to 15.
Skjaldmeyjar's Plate which will reduce the damage to 15.
Other
These points of interest are unique and only appear in certain parts of the game.
The Dish
Located in the right room of Helheim 2. After depositing 100![]() ,
, ![]() Giant Slayer Boots will appear. All subsequent runs will spawn the boots.
Giant Slayer Boots will appear. All subsequent runs will spawn the boots.